Cuban Bread
This post may contain affiliate links. Read our disclosure policy.
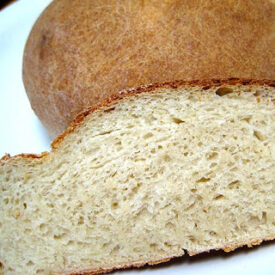
If you’re short on time but craving homemade bread, this quick and easy Cuban bread recipe is a must-try. From start to finish, it takes less than 1½ hours—no long proofing times or complicated steps required. The result is a beautifully rustic loaf with a deep brown crust, a satisfying crunch, and a dense, chewy interior that’s perfect for dipping, slathering with butter, or serving alongside soups and stews.
I first discovered this gem from Stephanie at Fun Foods on a Budget, and I’m so glad I finally gave it a try. It’s one of those recipes that feels almost too simple for how delicious the outcome is. Whether you’re a seasoned baker or just starting out, this bread delivers big flavor with minimal effort—and it’s quickly become a favorite in my kitchen.

Ingredients for Cuban Bread
- ALL-PURPOSE FLOUR (YOU CAN SUBSTITUTE WHOLE WHEAT FLOUR FOR 1 OR 2 CUPS)
- YEAST
- SUGAR
- SALT
- WATER
- SESAME OR POPPY SEEDS (OPTIONAL)
Instructions for Cuban Bread
Start the Dough – In a large mixing bowl, combine 4 cups of all-purpose flour with sugar, instant yeast, and salt. Stir to blend the dry ingredients.
Add Water & Mix – Pour in 2 cups of hot water (not boiling—just hot from the tap). Using a sturdy spoon or a stand mixer with a paddle attachment, beat the mixture for about 100 strokes or 3 minutes on medium speed. This helps activate the gluten and gives the dough a good head start.
Incorporate Remaining Flour – If using a stand mixer, switch to the dough hook. Gradually stir in additional flour (about 1 to 1½ cups) until the dough becomes soft but no longer sticky. You’re aiming for a dough that’s easy to handle and pulls away from the sides of the bowl.
Knead the Dough – Turn the dough out onto a lightly floured surface and knead for 8 minutes, until smooth and elastic. This step builds structure and gives the bread its signature chew.
First Rise – Place the dough in a greased bowl, cover it with a damp towel, and let it rise for just 15 minutes. Yes, really—just 15! It’s one of the reasons this recipe is so wonderfully quick.
Shape & Score – Punch down the dough to release air bubbles. Divide it in half and shape into two round or oblong loaves. Transfer to a greased or parchment-lined baking sheet. Using a sharp knife, make an X or a few slashes about ½ inch deep across the top of each loaf. Optional: Brush the tops with water and sprinkle with seeds like sesame or poppy. I usually skip this step—while it looks pretty, I find the seeds tend to fall off when slicing, which can be a bit messy.
Steam & Bake – Place the baking sheet on the middle rack of a cold oven. On the bottom rack, set a cake pan filled with hot water—this creates steam that helps develop a crisp crust. Turn the oven on to 400°F (200°C) and bake for 40 to 50 minutes, or until the loaves are a rich, deep golden brown.

Frequently Asked Questions
Can I use active dry yeast instead of instant yeast?
Yes! If you’re using active dry yeast, dissolve it in the warm water with the sugar and let it sit for 5–10 minutes until foamy before adding the flour and salt. This adds a few minutes to the process but works just as well.
What temperature should the water be?
The water should be hot but not boiling—around 120–130°F (49–54°C) is ideal for instant yeast. If it’s too hot, it can kill the yeast; too cool, and the dough may not rise properly.
Why does the bread go into a cold oven?
Starting in a cold oven allows the loaves to rise a bit more before the heat kicks in, giving them a better oven spring. The steam from the pan of hot water also helps create that crisp, crunchy crust.
Can I make this bread ahead of time?
Absolutely. Once baked and cooled, the loaves can be stored in an airtight container at room temperature for up to 2 days, or frozen for longer storage. Just reheat in the oven to revive the crust.
Can I make just one loaf instead of two?
Yes—just halve all the ingredients. You’ll end up with one medium-sized loaf. Keep an eye on the baking time; it may be slightly shorter.
What’s the texture like?
This bread has a dense, chewy interior and a deep brown, crunchy crust. It’s not light and fluffy like sandwich bread, but it’s perfect for dipping, spreading, or serving with hearty meals.
Do I need a stand mixer to make this?
Not at all! You can mix and knead the dough by hand. It might take a little more elbow grease, but the results are just as delicious.
Can I add herbs, cheese, or other mix-ins?
Definitely! Try folding in chopped rosemary, shredded cheese, or even roasted garlic during the kneading stage. Just keep mix-ins to about ½ cup total so the dough stays balanced.
FOR MORE LIKE THIS, TRY:
Cuban Bread
Real Mom Kitchen
Equipment


Ingredients
- 5-6 cups all-purpose flour you can substitute whole wheat flour for 1 or 2 cups
- 1 Tbsp yeast
- 2 Tbsp sugar
- 1 Tbsp salt
- 2 cups hot water 120-130 degrees
- 1 Tbsp sesame or poppy seeds optional
Instructions
- Mix 4 cups of the flour with the yeast, sugar, and salt. Pour in hot water and beat 100 strokes, or 3 minutes with a mixer. Stir in the remaining flour until the dough is no longer sticky. Knead 8 minutes. Place the dough in a greased bowl, and cover with a damp towel. Let rise 15 minutes (yes, 15 minutes).
- Punch down. Shape into two round or oblong loaves, and place on a baking sheet. Cut an X or a few slashes 1/2 inch deep on top with a sharp knife. If desired, brush with water and sprinkle with seeds (I chose not to do this because I don’t like it when the seeds fall off as you slice the bread – it’s really annoying).
- Place on the middle shelf of a cold oven. Place a cake pan of hot water on the lowest shelf. Heat the oven to 400 degrees. Bake 40 to 50 minutes until deep golden brown.