Home CuisineItalian Baked Manicotti

Baked Manicotti

18 comments

This post may contain affiliate links.

So after making the recipe for fried wontons that I posted yesterday, I had some leftover large square wraps.  I wanted to do something with them.  Something that was different.  Then all the sudden it hit me, you can actually consider the wraps pasta, I am going to use them to make baked manicotti.  It would be just like my own fresh pasta, duh! 

Next, I wanted a really good recipe to make the manicotti. 

I didn’t want to use bottled sauce.  I wanted something that was more authentic.  Then I remembered that Melanie at My Kitchen Cafe had posted a manicotti recipe a little while ago.  I pulled it up on here site and it was just what I was looking for.  It had a sauce made from canned tomatoes and a yummy ricotta filling.

Baked Manicotti | realmomkitchen.com
This is how you place the filling on the wrap

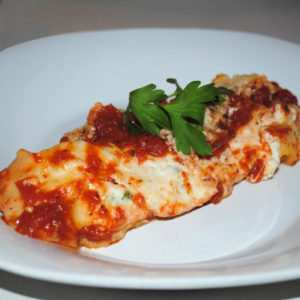
Oh, this baked manicotti turned out divine! 

I would say that it would rival that which you can get at a good Italian restaurant.  I felt like I was eating at Bucca di Peppo.  It was just like fresh pasta.  It was also so much easier than trying to stuff those slippery cone type manicotti shells you find on the pasta isle.  Add a nice green salad and slice of good bread and you are good to go.  I served this with the garlic herb braid that I recently posted, but a slice of herbed garlic bread or homemade french bread would have also been excellent.

One serving of this was also very filling.  I was able to get 2 meals out of it.  Next time, I am going to try the tip below and freeze half of the recipe.


homemade manicotti
Here is the manicotti rolls waiting to be drenched in sauce.


Finished and hot from the oven
Finished and hot from the oven.
Baked Manicotti | realmomkitchen.com
Here’s my serving before I devoured it.
Print
clock clock iconcutlery cutlery iconflag flag iconfolder folder iconinstagram instagram iconpinterest pinterest iconfacebook facebook iconprint print iconsquares squares iconheart heart iconheart solid heart solid icon
Baked Manicotti | realmomkitchen.com

Baked Manicotti


  • Author: Laura

Description

This recipe was tested with Azumaya large square wraps.


Ingredients

Units Scale

Tomato Sauce

  • 1 28ounce can diced tomatoes (in juice)
  • 1 28ounce can crushed tomatoes
  • 2 tablespoons extra-virgin olive oil
  • 3 medium cloves garlic, finely minced
  • 1/2 teaspoon red pepper flakes, optional
  • 1/2 teaspoon salt
  • 2 teaspoons dried basil

Cheese Filling and Pasta

  • 3 cups part-skim ricotta cheese
  • 4 ounces grated Parmesan cheese (about 2 cups)
  • 8 ounces shredded mozzarella cheese (about 2 cups)
  • 2 large eggs , lightly beaten
  • 3/4 teaspoon table salt
  • 1/2 teaspoon ground black pepper
  • 2 tablespoons chopped fresh parsley leaves
  • 2 teaspoons chopped fresh basil
  • 10 large square wraps (like for egg rolls. You should be able to find in the refrigerated portion of the produce section of you local grocery store)

Instructions

  1. Adjust oven rack to middle position and heat oven to 375 degrees.
  2. Heat oil, garlic, and pepper flakes (if using) in large saucepan over medium heat until fragrant but not brown, 1 to 2 minutes. Stir in tomatoes, basil and 1/2 teaspoon salt and simmer until thickened slightly, about 15 minutes.
  3. In a medium bowl, combine ricotta, 1 cup Parmesan cheese, mozzarella cheese, eggs, salt, pepper, and herbs; set aside.
  4. Spread bottom of baking dish evenly with 1 1/2 cups sauce. Using spoon, spread 1/4 cup cheese mixture evenly onto bottom three-quarters of each wrap, leaving top quarter of wrap exposed. Roll into tube shape and arrange in baking dish seam side down. (You should be able to fit 8 manicotti in one row and 2 along the edge). Top evenly with remaining sauce, making certain that pasta is completely covered.
  5. Cover manicotti with aluminum foil. Bake until bubbling, about 40 minutes, then remove foil. Sprinkle manicotti evenly with remaining 1 cup Parmesan. Bake until cheese is browned and bubbly, about 6-7 minutes. Remove from oven and let sit for 15 minutes before serving.  Serves 10.

Notes

[Tip from My Kitchen Cafe recipe – I haven’t tried this yet but I would think it would work.  I will try it next time I make it.  The manicotti can be prepared right up until the baking step then covered with a sheet of parchment paper, wrapped in aluminum foil, and refrigerated for up to 3 days or frozen for up to 1 month. (If frozen, thaw the manicotti in the refrigerator for 1 to 2 days.) To bake, remove the parchment, replace the aluminum foil, and increase baking time to 1 to 1 1/4 hours.]

Recipe Card powered byTasty Recipes

Leave a Comment

Recipe rating 5 Stars 4 Stars 3 Stars 2 Stars 1 Star

* By using this form you agree with the storage and handling of your data by this website. Your email address will not be published.

18 comments

Laura January 27, 2017 - 12:53 pm

Looks amazing! But unless I missed something, the proportion of cheese to # of manicotti rolls is off by quite a bit. 3 c. ricotta + 2 c. mozzarella + parmesan + eggs comes out to something north of 5 cups of filling. If spreading 1/4 c on each of 10 egg roll wrappers, that would leave more than half of the cheese filling unused.

Reply
Debbie June 19, 2016 - 3:40 pm

Amazing!!! Used store bought sauce and added meat to it, also added cottage cheese to the filling. Super easy to make, and much better than noddles. Big hit at my house and def will be making again!!!

Reply
Kids in the Kitchen – Skillet Supper | Real Mom Kitchen June 8, 2012 - 8:25 am

[…] this summer.  My boys planned out their meals for the next to weeks to make.  One is making baked manicotti – I found this to be quick ambitious for a 12 year old but he is making something he loves.  I […]

Reply
larry kimball June 12, 2011 - 9:42 am

I loved these pics, and saved the recipe – it looks delicious! Instead of buying the wraps, I will roll out some pasta dough into thin sheets for this recipe. Thanks lots!

Reply
Baked Manicotti —      Nom January 21, 2011 - 8:12 am

[…] Source: Real Mom Kitchen […]

Reply
manra November 13, 2010 - 7:58 pm

recipe is great indeed but totally taken from America’s Test Kitchen with one exception in ingredients-Barilla no boil noddles and dried basil…

Reply
Stephanie May 12, 2010 - 5:52 pm

This was SO yummy. I love all the basil. Also, the wonton wraps were SO MUCH EASIER than filling the pre-made shells. Brilliant! It makes me want to make manicotti more often! Also, sidenote… I used cottage cheese instead of ricotta because my husband despises ricotta, and it was very tasty.

Reply
the thrifty ba January 31, 2010 - 2:13 pm

i was so scared when i saw your post about manicotti…im italian and now live in utah (originally from philly) and it seems here that people subsutite ricotta with cottage cheese quite often.
that isnt a good idea.
i grew up on ricotta (that is the 1st chese we ate) and i LOVE it. thank you for useing a recipe that is pretty close to my own. and for the sauce (gravy as we call it), crushed tomatoes are the best to use.
i will be trying this with my family tomorrow for dinner!

Reply
Jenny January 27, 2010 - 10:07 am

I just made the previous comment, but I was just thinking that you may want to omit the part about putting noodles into 1 inch boiling water. I’m silly but I got confused about this part until I realized it was from the original recipe (using noodles) and not from this recipe. I just rolled the Azumya squares with the cheese filling. 🙂

Reply
Jenny January 26, 2010 - 7:36 pm

We just tried this recipe tonight!!! It was definitely divine!! It is restaurant worthy! My husband loved it and my two-year-old, who lives on corndogs, ate it! Thank you!!! The Azumaya squares made it so much easier too! We’ll definitely be making this again!

Reply
Jessica Feely January 21, 2010 - 6:54 pm

This looks SOOOOO yummy! 🙂 Thanks for sharing!

Reply
Julie January 21, 2010 - 6:16 pm

What can I say…it looks amazing! Very nice job.

Reply
fittingbackin January 21, 2010 - 2:38 pm

That looks amazing!! Me and my husband LOVE buca!!

Reply
Deidra January 21, 2010 - 1:09 pm

That has got to be one of the most brilliant ideas I’ve seen in a while .. I always have leftover wonton wrappers!!!!
Thanx so much for showing us this!

Reply
Melanie January 21, 2010 - 8:00 am

Laura – fantastic idea to use wonton wrappers as the pasta dough. I’ve always used the Barilla no-boil noodles but sometimes they are hard to find so I’m glad to see your post! This is definitely one of our family’s favorite meals so I’m glad it was a hit with you, too.

Reply
Linda January 21, 2010 - 7:22 am

Oh my goodness, my son would go goo goo over this one. I even think he will help make this one. He does help when I make them with the premade pasta shells but if he thought it was even more Italian like this, he would be here in a second. Thanks.

Reply
Lisa January 21, 2010 - 6:47 am

what a brillant idea! So much easier that trying to fill manicotti shells, which usually split open. I will definitely give this one a try. Thanks!

Reply
Lisa January 21, 2010 - 6:47 am

what a brillant idea! So much easier that trying to fill manicotti shells, which usually split open. I will definitely give this one a try. Thanks!

Reply