Orange Dream Fudge
This post may contain affiliate links. Read our disclosure policy.
When I think of Christmas, one of the first scents that comes to mind is the bright, fresh smell of oranges. Growing up, Santa always tucked a juicy orange into the toe of our stockings—a simple tradition that filled the house with citrusy cheer and still brings back warm memories every holiday season. So when it came time for fudge week, I knew I had to create something that captured that nostalgic flavor: Orange Dream Fudge.
This recipe is a cooked fudge, but don’t worry—it’s one of the easiest versions out there. No candy thermometer required, and no complicated steps. Just a few simple ingredients, a little stirring, and you’re on your way to a creamy, dreamy treat that tastes like a orange creamsicle in fudge form.
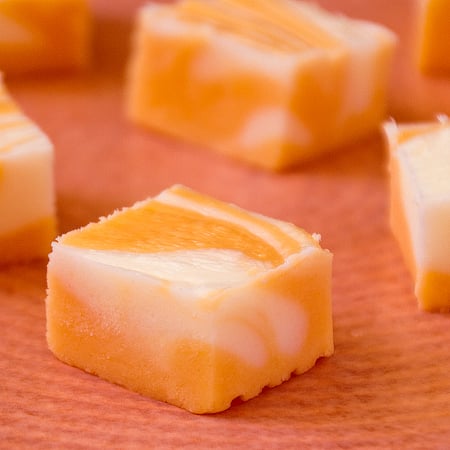
What makes this simple fudge extra fun is its swirled appearance. You’ll keep part of the mixture white and tint the rest a soft orange, then swirl them together for a beautiful marbled effect that looks just as festive as it tastes. It’s a perfect addition to your holiday treat trays, and a sweet way to bring a tasty treat with a little citrus magic to your Christmas celebrations. It works great as a gift too!
Ingredients For Orange Dream Fudge
- BUTTER
- SUGAR
- HEAVY WHIPPING CREAM
- PACKAGE VANILLA OR WHITE CHIPS
- MARSHMALLOW CREAM
- ORANGE EXTRACT
- YELLOW FOOD COLORING
- RED FOOD COLORING
Instructions For Orange Dream Fudge
Start by prepping your pan: line a 13×9-inch baking pan with foil or parchment paper, making sure it extends slightly over the edges for easy removal later. Lightly butter the foil to prevent sticking, then set the pan aside while you work your fudge magic.
In a heavy-bottomed saucepan, combine granulated sugar, heavy cream, and butter. Place the pan over low heat and stir gently until the sugar is completely dissolved. Don’t rush this step—it’s essential for achieving that smooth, creamy texture we all love in fudge.
Once the sugar has melted into the mixture, increase the heat to medium and bring it to a gentle boil. Continue stirring constantly and let it bubble away for about 4 minutes. This helps thicken the mixture and develop that rich, velvety base.
Next, remove the pan from the heat and stir in white chocolate chips and marshmallow crème. Keep stirring until everything is melted and silky smooth.
Now for the fun part: scoop out 1 cup of the mixture and set it aside in a small bowl. This will be your swirl layer.
To the remaining mixture in the pan, add orange flavoring and a few drops of orange food coloring. Stir until the color is evenly blended and the mixture smells like citrusy heaven.
Pour the orange fudge into your prepared pan, smoothing it out with a spatula. Then, drop spoonfuls of the reserved white mixture over the top. Use a butter knife to gently swirl the two together, creating a beautiful marbled effect.
Cover the pan and refrigerate until the fudge is fully set—this usually takes a couple of hours. Once firm, lift the fudge out using the foil edges, peel away the foil, and cut into bite-sized squares.
Frequently Asked Questions
Do I need a candy thermometer for this recipe?
Nope! That’s one of the best parts—this is a cooked fudge recipe, but it’s super simple and doesn’t require a candy thermometer. Just follow the timing and visual cues, especially during the boiling step.
Can I use a different pan size?
A 13×9-inch pan works best for traditional fudge squares, but you can use a smaller pan for thicker pieces or a larger one for thinner bites. Just adjust the cutting size and keep an eye on the setting time.
What kind of white chocolate chips should I use?
Use good-quality white chocolate chips or chopped white baking chocolate for the smoothest texture. Avoid candy melts or almond bark—they don’t melt the same way and can affect flavor.
Can I skip the food coloring?
Yes! The orange extract gives plenty of flavor, so the food coloring is just for visual appeal. If you prefer a natural look, feel free to leave it out or use a natural food dye.
How long does the fudge take to set?
It usually takes 2–3 hours in the fridge to fully set, but you can leave it overnight for best results. Once firm, it’s easy to lift out and slice.
How should I store the fudge?
Store it in an airtight container in the fridge for up to 2 weeks. You can also freeze it for longer storage—just wrap tightly and thaw in the fridge before serving.
Can I use other extracts instead of orange?
Definitely! Try lemon, raspberry, or even peppermint for a seasonal twist. Just swap the extract and adjust the food coloring to match.
FOR MORE RECIPES LIKE THIS, TRY:

Orange Dream Fudge
Real Mom Kitchen
Ingredients
- ¾ cup butter
- 3 cups sugar
- ¾ cup heavy whipping cream
- 10-12 oz pkg vanilla or white chips
- 7 oz marshmallow crème
- 1 Tbsp orange extract
- 12 drops yellow food coloring
- 5 drops red food coloring
Instructions
- Line a 13×9 in. pan with foil and grease with butter; set aside.
- In a heavy saucepan, combine sugar, heavy cream, and butter. Cook and stir over low heat until sugar is dissolved (this is a key step)
- Once sugar is dissolved, bring to a boil over medium heat; cook & stir for 4 minutes.
- Remove from heat; stir in chips and marshmallow crème till smooth.
- Remove one cup from the mixture and set aside.
- Add orange extract and food coloring to remaining mixture; stir until blended.
- Pour the orange mixture into prepared pan.
- Drop reserved marshmallow mixture by tablespoonfuls over the top; cut through with a knife to swirl.
- Cover & refrigerate until set. Using foil, remove from pan and cut into squares.