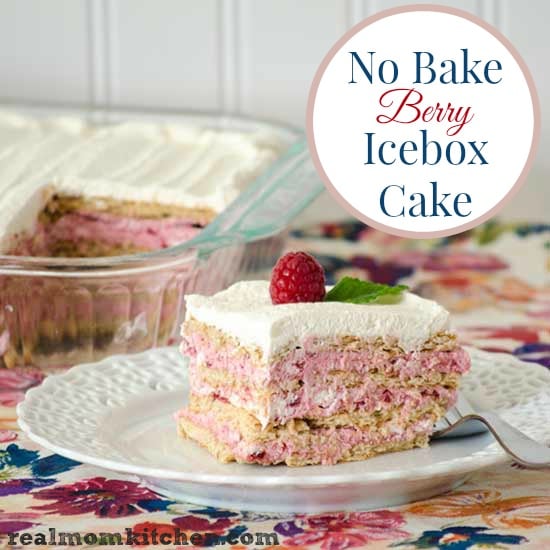
No Bake Berry Icebox Cake
This post may contain affiliate links. Read our disclosure policy.
One of the flavors that I think of when I think of spring is berries. Any berry will do, I never met a berry I didn’t like! Today, I have a simple yet impressive No Bake Berry Icebox Cake using Lucky Leaf pie filling. Lucky Leaf pie filling is a quick and simple baking or non-baking solution (like with this recipe). I love to keep it on hand in my pantry because it’s a convenient and versatile baking ingredient.
This recipe can be made using their raspberry or blackberry pie filling. Raspberry gives it a beautiful bright pink color where the blackberry will give you a lovely purple color. Either one tastes amazing! Berries and cream always go well together. Cream is folded with the raspberry or blackberry pie filling. Then it gets layered between sheets of graham crackers that soften to a cake like texture after a little time in the refrigerator.

I made the version in the photo with raspberry pie filling. I was thinking it would be a perfect treat to make for mom on Mother’s Day and it is easy enough that the kids can be involved. Or older kids could make it all on their own. No cooking is required! This also makes an excellent dessert recipe to have on hand when summer arrives too!
Add a garnish of a fresh raspberry and mint leaf to each serving to make it extra special.


No Bake Raspberry Icebox Cake
Real Mom Kitchen
Ingredients
- 3 ½ cups cups whipping cream
- ¾ cup powdered sugar
- 2 tsp vanilla extract
- 1 21 oz can raspberry or blackberry pie filling
- 4 sleeves of graham crackers
- fresh raspberries or blackberries and mint leaves optional for garnish
Instructions
- In a bowl, whip whipping cream to firm peaks. Then whip in the powdered sugar and vanilla. Remove ¼ of the whipping cream from the bowl and place in another bowl, then set aside.
- Add half of the pie filling into the remaining ¾ of the whipping cream and gently fold 3-4 times.
- Add the remaining pie filling and gently fold another 3-4 more times. You don’t want the raspberry pie filling to be completed mix in.
- Place a layer of graham crackers in the bottom of a 9 x 13 inch dish. Then spread 1/3 of the raspberry cream mixture over the graham crackers. Repeat this 2 more times.
- Top with a final layer of graham crackers. Then spread the whipped cream you set aside over the last layer of graham crackers.
- Cover with plastic wrap and refrigerate for at least 2 hours of overnight.
- Cut into squares to serve and garnish with a mint leaf and fresh raspberry or blackberry if desired. Serves 12-15.
Real Mom Kitchen original recipe.
Disclosure: This is a sponsored post. As always, my opinions are 100% my own.
Use the following links to follow Lucky Leaf on Facebook, Twitter, or Pinterest.
