
Chocolate Caramel Bars
This post may contain affiliate links. Read our disclosure policy.
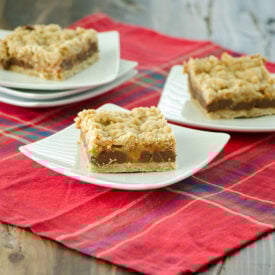
These chocolate caramel bars are such a delicious sweet treat. They are rich, gooey, and full of chocolatey, caramelly flavor, but they come together with just 9 simple ingredients. That makes them an easy dessert to whip up when you want something homemade without a lot of fuss.
The base for these bars is quick and simple to make. Oats, butter, brown sugar, flour, salt, and baking soda are mixed to create a buttery mixture that serves as both the crust and the topping. It bakes up with a soft, chewy texture and is the perfect layer to hold all of that chocolate and caramel in between.

The center is where all the real indulgence happens. Chocolate chips add plenty of rich chocolate flavor, while the caramel layer brings that soft, gooey sweetness that makes these bars so hard to resist. Together, they make every bite taste extra special.
The caramel layer itself is also very easy to make. It comes together by melting store-bought wrapped caramels with a little milk until smooth and creamy. I like to use the caramel bits you can find near the chocolate chips because they melt faster and save you the step of unwrapping all of those individual caramels. It is a simple shortcut that makes this recipe even easier.
Ingredients for Chocolate Caramel Bars
- ALL-PURPOSE FLOUR – Flour provides structure to the bars and forms the base and topping layers. It works with the oats to make the crust sturdy while still keeping it soft and chewy.
- OLD-FASHIONED OATS – Old-fashioned oats add texture and make the crust and topping a little heartier. They also give the bars that classic chewy oat texture that works so well with chocolate and caramel.
- BROWN SUGAR – Brown sugar adds sweetness and a rich, caramel-like flavor. It also helps keep the bars soft and chewy.
- BAKING SODA – Baking soda helps give the crust a little lift and keeps it from being too dense. It helps the oat mixture bake up with the right texture.
- SALT – Salt balances the sweetness and brings out the flavors of caramel and chocolate. Even a small amount makes a big difference.
- BUTTER – Butter adds richness and helps bind the crust mixture together. It also gives the bars that delicious buttery flavor.
- CARAMELS – The caramels melt down to create the gooey center layer of the bars. They add a sweet, rich caramel flavor that makes these bars even more irresistible.
- MILK – Milk is added to the caramels to help them melt smoothly and turn into a creamy caramel layer. It keeps the caramel from being too thick.
- MILK CHOCOLATE CHIPS – Milk chocolate chips add the sweet chocolate layer that pairs perfectly with the gooey caramel. They melt into the bars and make every bite rich and delicious.

Instructions for Chocolate Caramel Bars
Preheat the oven to 350 degrees and spray a 9×13-inch baking dish with nonstick cooking spray.
In a large bowl, combine the flour, oats, brown sugar, baking soda, and salt. Add the softened butter and mix until the mixture becomes crumbly.
Press half of the oat mixture in an even layer into the bottom of the prepared baking dish. Bake for 10 minutes to give the crust a head start.
While the crust bakes, place the caramels and milk in a medium saucepan. Cook over low heat, stirring constantly, until the caramels are completely melted and the mixture is smooth.
Remove the crust from the oven and sprinkle the chocolate chips evenly over the top. Pour the melted caramel over the chocolate layer, spreading it out as evenly as possible.
Crumble the remaining oat mixture over the top of the caramel layer. Return the pan to the oven and bake for another 15 minutes.
Let the bars cool completely before cutting them into squares. This recipe makes about 15 bars.
Frequently Asked Questions
Can I use caramel bits instead of wrapped caramels?
Yes. Caramel bits work great in this recipe and are an easy shortcut. They melt faster and save you the time of unwrapping individual caramels.
Do I have to use old-fashioned oats?
Old-fashioned oats work best because they give the bars the right chewy texture. Quick oats may change the texture a little.
Can I use semisweet chocolate chips instead of milk chocolate chips?
Yes. Milk chocolate gives the bars a sweeter flavor, but semisweet chocolate chips will also work well if you want a little less sweetness.
Why do I bake the bottom crust first?
Baking the bottom layer first helps it set up before adding the chocolate and caramel. This keeps the bars from getting too soft underneath.
How do I keep the caramel layer smooth?
Melt the caramels slowly over low heat with the milk and stir constantly. This helps the caramel melt evenly and keeps it nice and smooth.
Can I make these bars ahead of time?
Yes. These bars are a great make-ahead dessert. Just let them cool completely before cutting and storing.
Why do I need to let them cool completely before cutting?
Cooling gives the chocolate and caramel time to set. If you cut them too soon, the layers can be too soft and messy.
How should I store chocolate caramel bars?
Store them in an airtight container at room temperature or in the refrigerator. If you like a firmer caramel layer, the refrigerator works especially well.
Can I freeze these bars?
Yes. Once they are fully cooled and cut, you can freeze them in an airtight container with parchment between layers. Thaw before serving.
Can I serve these for holidays or parties?
Absolutely. These bars are a great dessert for potlucks, parties, bake sales, and holiday gatherings because they are easy to cut and serve.
Tips and Tricks
- Use caramel bits if you can find them. They melt faster and save you from unwrapping a whole bag of caramels.
- Bake the bottom crust first. That short pre-bake helps the base set up so the bars hold together better once the caramel and chocolate are added.
- Melt the caramel slowly over low heat. Stirring constantly and keeping the heat low helps the caramel turn out smooth instead of scorched or lumpy.
- Let the bars cool completely before cutting. This gives the chocolate and caramel time to set so the bars slice much more cleanly.
- Press the bottom layer firmly into the pan. A well-packed crust helps create a sturdy base that holds up under the gooey caramel and chocolate layers.
FOR MORE RECIPES LIKE THIS, TRY:
- Peaches and Cream Crumble Bars
- Lunch Lady Peanut Butter Bars
- Easy Scotcheroo Bars
- Brown Butter Cookie Bars
Chocolate Caramel Bars
Real Mom Kitchen
Equipment

Ingredients
- 1 cup all-purpose flour
- 1 cup old-fashioned oats
- 1 cup brown sugar
- ½ tsp baking soda
- ¼ tsp salt
- ¾ cup butter softened
- 14 oz pkg caramels unwrapped
- ¼ cup milk
- 11.5 oz bag milk chocolate chips
Instructions
- Preheat oven to 350 degrees F. Spray a 9×13-inch baking dish with non-stick cooking spray.
- In a large bowl, combine the flour, oats, brown sugar, baking soda, and salt together. Stir in the softened butter and mix until crumbly.
- Press half of the mixture into the bottom of the prepared pan and bake in the preheated oven for 10 minutes.
- In a medium saucepan, combine the caramels and milk. Warm over low heat, stirring constantly until the caramel is melted and smooth.
- Remove the bottom crust from the oven and sprinkle chocolate chips evenly over the top. Pour the melted caramel evenly over the chocolate.
- Crumble the remaining flour/oats over the caramel. Bake for an additional 15 minutes. Allow to cool completely before cutting into bars. Serves 15.
Nutrition
This recipe was adapted from Pip and Debby.
